
Works the same in the Photos tab (cross-project library) and in any project's Photos tab.
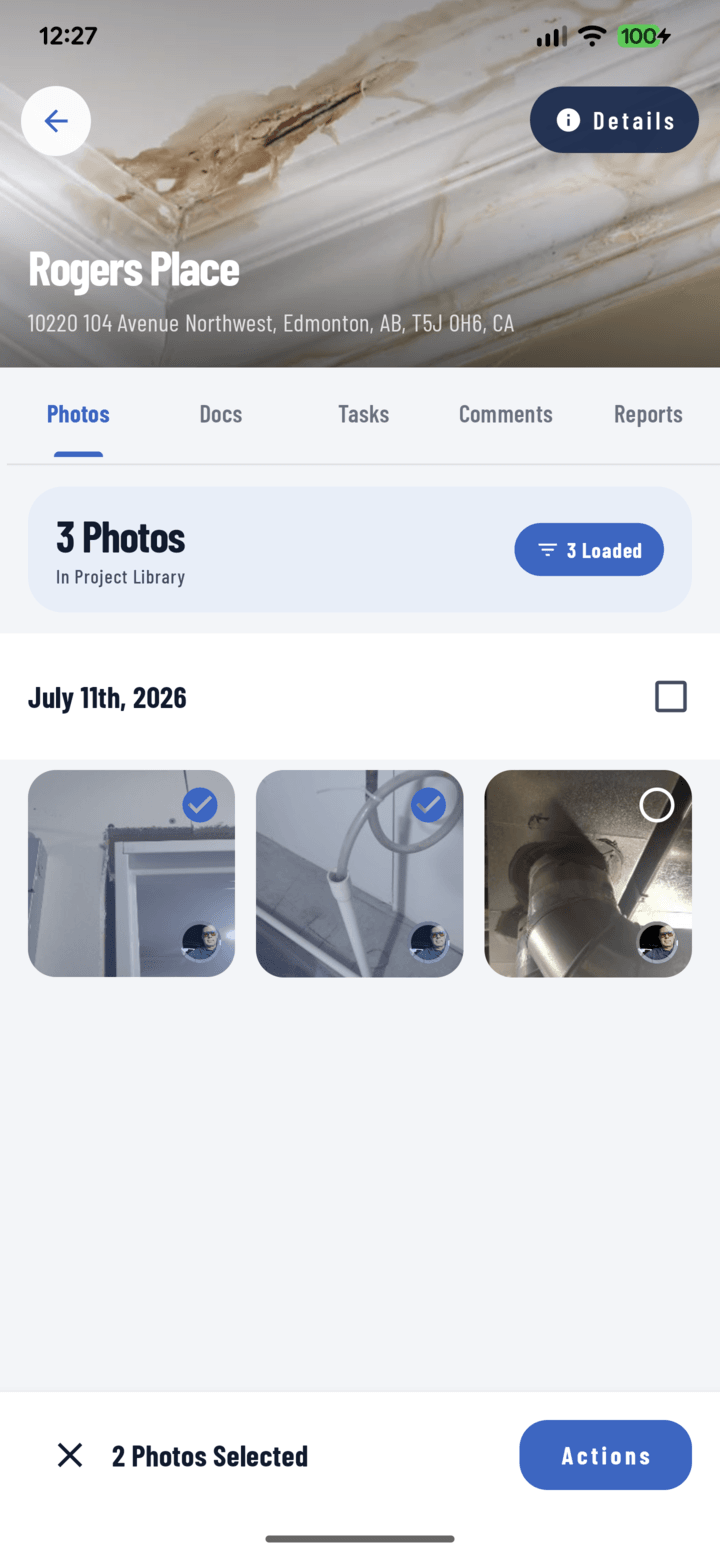
Selection mode: checkmarks on selected items and the Actions button in the selection bar.
Part 1 — Entering and Using Selection Mode
Start selecting
- Open the Photos tab (or a project's Photos tab).
- Long-press any photo or video. The grid enters selection mode: the pressed item is selected, checkmarks appear, and the selection action bar appears.
Build your selection
- Tap any other photo/video to add it; tap again to remove it.
- Select a whole day at once: every date header has a select-all toggle — one tap selects (or deselects) every item captured that day. Ideal for "everything from Tuesday's inspection."
- Mix techniques freely: toggle two whole days, then tap off the three shots you don't want.
- Videos select the same way as photos (they show a video badge).
Narrow before you select
Filters and selection combine — the strongest workflow is filter first, select second:
- Open the filter dialog and narrow to what you need: My Photos, media type, operator, tags, "with comments/tags/notes", date range, search.
- The grid now only shows matching items — select whole date groups with confidence.
Example: filter to tag: "punch list" + date: this week, then select-all each day → every punch-list photo from this week, selected in seconds.
Exit selection mode
- Back out (system back / back gesture), or complete any action — the grid returns to normal browsing.
Part 2 — The Actions
With a selection active, open the actions sheet from the selection action bar. Every action below applies to the entire selection at once.
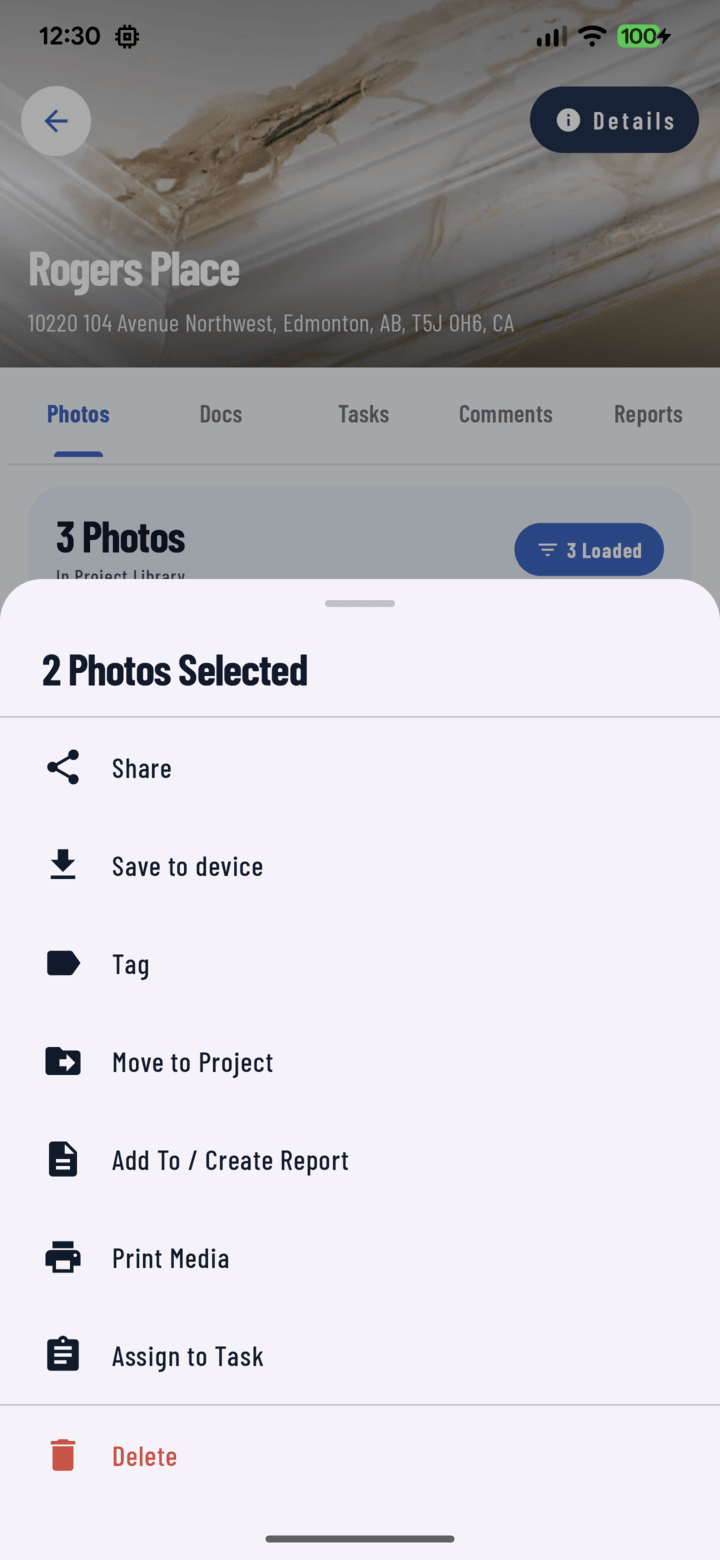
The actions sheet — all eight bulk actions, applied to the entire selection.
Share
Sends the selected media through your phone's native share sheet.
- Select photos/videos → Share.
- CrewBox downloads full-resolution copies (a progress overlay shows while it fetches).
- The system share sheet opens — pick text/SMS, email, WhatsApp, Slack, AirDrop, or any installed app.
Use it for: sending progress shots to a client mid-conversation, forwarding an issue to a sub who isn't on CrewBox.
Save to Device
Exports the selection out of CrewBox into your phone's photo library (Android gallery / iOS Photos).
- Select → Save to Device.
- A progress overlay runs while items download; a snackbar confirms completion.
Use it for: building a personal portfolio, prepping images for other software, keeping local copies before leaving a job. Note: originals always remain in CrewBox — this copies, it never moves.
Tag
Applies tags to every selected item in one pass.
- Select → Tag.
- The tag dialog opens with the project's tag vocabulary — select one or more tags.
- Confirm — every selected photo/video receives those tags.
Use it for: retro-tagging a day of untagged captures ("insulation", "unit 204"), stamping a batch as "warranty" or "billing". Tip: tagging at capture time (tag chips in the camera) is even faster — bulk Tag is the cleanup tool. See Tag and organize photos.
Move to Project
Transfers the selection to a different project — the fix for "shot the whole morning under yesterday's job."
- Select → Move to Project.
- Pick the destination project from the searchable list (name/address shown).
- Confirm. The media leaves this project and appears in the destination, with comments, tags, notes, and annotations intact.
- A notification confirms the transfer result (success/failure counts).
Use it for: wrong-project captures, splitting one visit's photos across two adjacent jobs. Full guide: Move photos between projects.
Prints the selected photos through the platform print dialog.
- Select → Print.
- Items download (progress overlay), then the system print screen opens — choose printer, copies, paper.
Use it for: hard copies for a site binder, permit office visits, homeowner walkthrough packets.
Assign to Task
Turns the selection into the evidence for a new task — the fastest issue-report in the app.
- Select the photos/videos showing the problem → Assign to Task.
- The task creation form opens with the media already attached.
- Add a title ("Repair flashing at chimney"), set priority/status/due date, assign a crew member, tag it, and Save.
- The assignee gets an Assignment notification; opening the task shows them exactly what the problem looks like.
Use it for: punch-list items, safety issues, rework orders — anything where "go look at this" needs photos attached. Tip: with New-task defaults configured (Profile → Default Settings), this flow collapses to: select → Assign to Task → type title → Save. Full guide: Create and assign tasks.
Add to Report
Feeds the selection straight into a PDF progress report.
- Select → Add to Report.
- Choose:
• Create new report — a fresh report opens in the editor with your photos ready to place, or
• An existing report from the list — the photos append to it. - Continue in the report editor: arrange photos into sections, set captions and display mode (Original / Annotation / Both), then Generate PDF.
Use it for: building the weekly progress report from the field as the week happens, instead of reconstructing it Friday afternoon. Full guide: Build a PDF report.
Delete
Removes the selected media permanently.
- Select → Delete.
- A confirmation dialog states the count — confirm to delete.
Permissions: deletion is limited to the project owner, project managers, or the person who captured each item; media still uploading can't be deleted from here. Use it for: duplicates, pocket shots, and burst-mode rejects. Warning: deletion is permanent — if in doubt, Save to Device first.
Quick Reference
| Action | What it does | Needs confirmation? | Who can |
|---|---|---|---|
| Share | Native share sheet with full-res copies | No | Anyone on the project |
| Save to Device | Copies to phone gallery | No | Anyone on the project |
| Tag | Applies tags to all selected | No | Anyone on the project |
| Move to Project | Transfers media (with comments/tags/annotations) to another project | Yes | Anyone on the project |
| System print dialog | Via print dialog | Anyone on the project | |
| Assign to Task | New task with media pre-attached | Task form save | Anyone on the project |
| Add to Report | Append to existing or start new report | Via report editor | Anyone on the project |
| Delete | Permanent removal | Yes — count shown | Owner / manager / photographer |
Documents too: the project's Documents tab has the same long-press selection with its own action set — Share, Save to Device, Tag, Rename, Move to Project, Print, Assign to Task, Delete. See Upload and view documents.
Related
- Tag and organize photos
- Move photos between projects
- Create and assign tasks
- Build a PDF report
- FAQ: Photos & Camera